Airtable Integration Guide for Zenity
This guide walks you through setting up an Airtable integration with Zenity using Access Token authentication.
🧩 Prerequisites
Before you begin, make sure you have:
- An active Airtable account
- Zenity Administrator access
- Enterprise Account ID (optional, required only if using an Airtable Enterprise license)
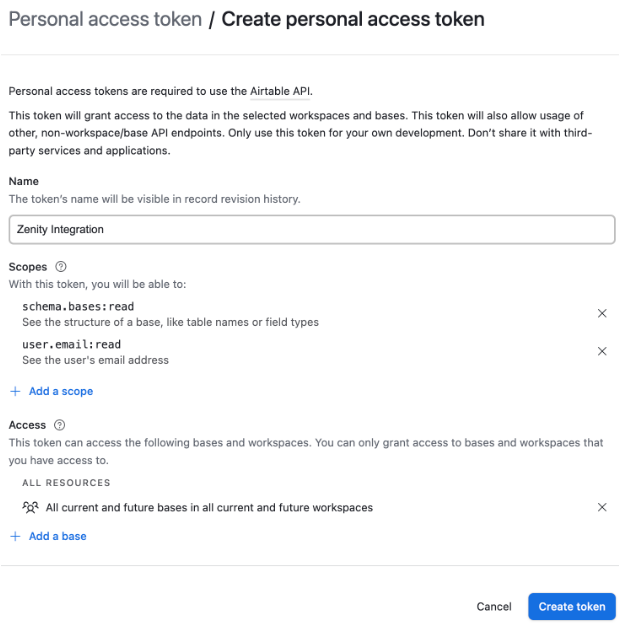
1. Create an Access Token in Airtable
Step 1.1: Generate a New Token
- Log in as an Airtable admin user.
- Go to https://airtable.com/create/tokens.
- Click Create token.
Step 1.2: Configure the Token
Name
Enter a descriptive name for the token (e.g., Zenity Integration).
Scopes
Add the following required scopes:
| Scope | Description |
|---|---|
schema.bases:read |
Access base metadata, structure, and table schemas |
user.email:read |
Identify users and their access patterns |
enterprise.user:read |
Identify enterprise users and access patterns |
enterprise.groups:read |
View information about user groups, access, and members |
enterprise.account:read |
View enterprise account data (workspaces, users, groups, domains) |
workspacesAndBases:read |
Manage workspaces and bases under the enterprise |
workspacesAndBases.shares:manage |
View, enable, disable, and delete share links for bases |
💡 Optional: The last scope provides visibility and risk assessment for sharing links with unauthorized users.
Note:
These minimal scopes allow Zenity to collect metadata about your Airtable bases and tables without accessing actual data records.
Zenity only requires the structure and user access information—not the content itself.
Access
Select:
- All resources → Grants access to all current and future bases in all workspaces.
Step 1.3: Create and Save the Token
- Click Create token.
- Important: Copy the generated token immediately and store it securely.
The token will only be displayed once and cannot be retrieved later.
2. Retrieve the Enterprise Account ID (Optional)
This step is only required if your Airtable account is on an Enterprise plan and you want to enable enterprise-specific features.
Step 2.1: Access the Admin Panel
- Log in to your Airtable account with administrator privileges.
- Navigate to the Admin Panel.
Step 2.2: Locate the Account ID
- In the Admin Panel, click the Settings tab.
- Under the Organization section, find your Enterprise Account ID.
- Copy this ID for use in the Zenity integration setup.
ℹ️ Note: If you don’t have an Enterprise account or don’t need enterprise features, you can skip this step.
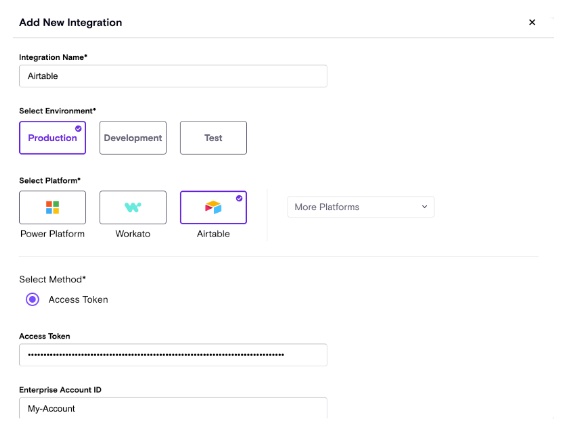
3. Create the Airtable Integration in Zenity
Step 3.1: Access Zenity Integrations
- As a Zenity Administrator, go to the Zenity Integrations page.
Step 3.2: Create a New Integration
- Click Create Integration.
- Enter a name for the integration.
- Select the environment (Production, Development, or Test).
- Choose Airtable from the list of available integrations.
Step 3.3: Provide Integration Details
Access Token
- Enter the Access Token you generated in Step 1.
- This field is required and will be masked for security.
Enterprise Account ID (Optional)
- If you have an Enterprise account, enter the Enterprise Account ID obtained in Step 2.
- Leave blank if you don’t have an Enterprise account.
Step 3.4: Finalize the Integration
- Click Create to establish the integration.
- Zenity will validate the connection by testing access to your Airtable bases.
- Upon success, the integration status will be marked as Active.
🧠 Troubleshooting
Common Issues & Solutions
Invalid Access Token
- Confirm the token was copied correctly.
- Ensure the token has not expired.
- Verify that the required scopes are included.
Access Denied
- Confirm the token includes all required scopes (see Step 1.2).
- Ensure the token has access to the bases you want to monitor.
Connection Failed
- Check Airtable’s service status.
- Ensure the token is active and has not been revoked.
🌐 Networking Requirements
If your company policy requires you to safelist IP Addresses for your inbound integrations then please make sure the below IPs are safelisted:
18.200.62.37 52.31.196.233 108.128.206.229 99.81.56.225