Zenity Integration Guide for Endpoint Agent
Zenity's Endpoint Agent is a ligthweight service running on Windows & MacOS devices, that provides organizations with enhanced shadow AI discovery, threat detection & real-time protection capabilities directly on endpoint devices.
This guide walks you through installing and configuring Zenity's Endpoint Agent on your enterprise devices using an enrollment key provided to you by Zenity.
Prerequisites
Before you begin, make sure you have:
- Zenity Administrator access to create the Devices integration
- Access to a Unified Endpoint Management (UEM) platform (e.g., Microsoft Intune, JAMF)
- Administrative privileges on target devices
- For Windows: Ability to deploy MSI packages via UEM
- For MacOS: Ability to deploy PKG files and mobile configuration profiles via UEM
Supported Platforms
| Endpoint OS | Deployment Options |
|---|---|
| Windows | - Microsoft Intune - Local Script (Requires admin permissions) |
| MacOS | - Microsoft Intune - JAMF - Local Script (Requires admin permissions and a trusted root certificate) |
1. Create the Integration in Zenity
If you don't already have a Devices integration configured in your Zenity account, follow these steps to create one.
Step 1.1: Access Zenity Integrations
- As a Zenity Administrator, go to the Zenity Integrations page.
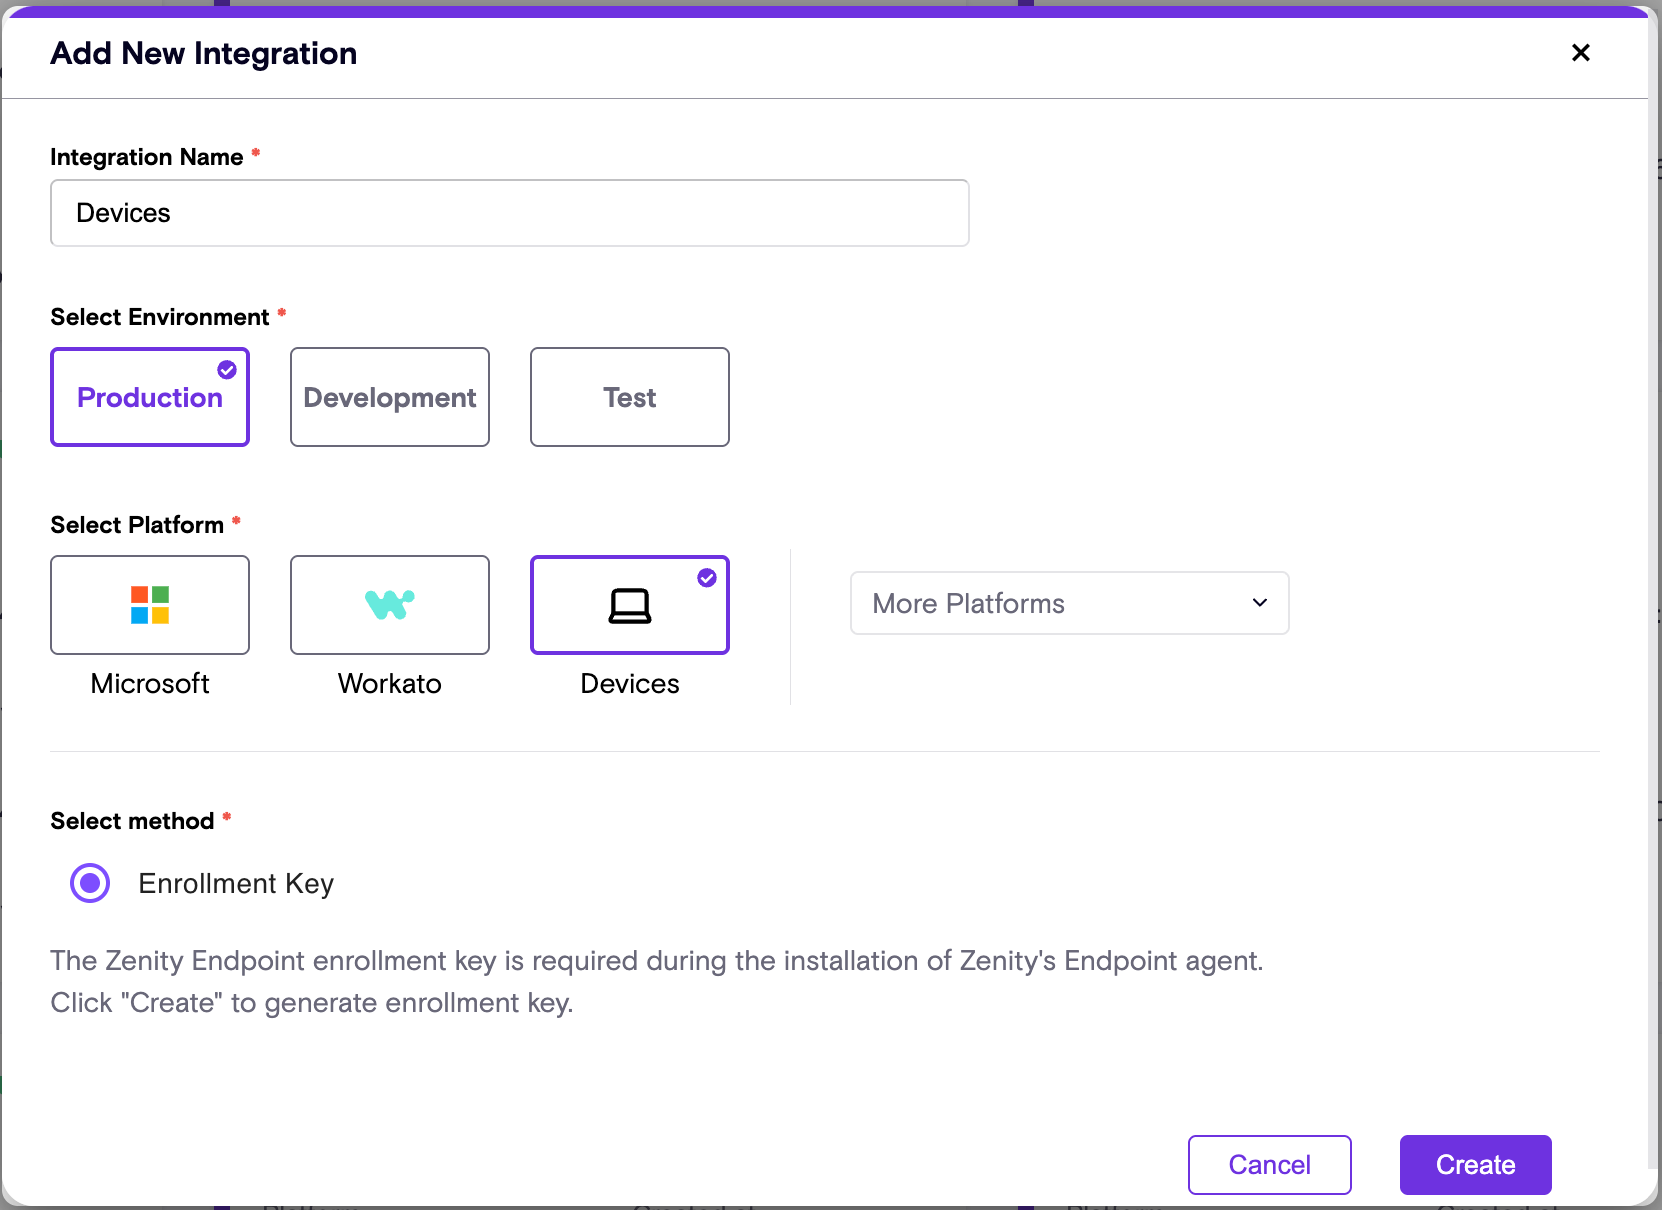
Step 1.2: Create a New Devices Integration
- Click Create Integration in the top-right corner.
- Enter a name for the integration.
- Select the environment (Production, Development, or Test).
- Choose Devices from the list of available integrations.
Step 1.3: Obtain the Enrollment Key
Once the integration is created, an enrollment key will be generated for your Zenity account and will be available in the integration panel.
- Copy this enrollment key - it will be required as a parameter during the device agent installation.
- The enrollment key is used to validate your license and associate onboarded devices with your Zenity account.
- You can also download the latest installer from the Devices integration panel.
2. Deploy the Endpoint Agent
For Windows Devices
Step 2.1: Obtain the Installer
Download the latest version of Zenity's Endpoint Agent Installer (MSI file) from the Devices integration panel in Zenity.
Step 2.2: Deploy the Endpoint Agent
Within your preferred Unified Endpoint Management (UEM) platform:
- Create a new app deployment.
- Select the Zenity MSI package file for installation.
- Most app properties should be automatically populated.
Alternatively, run the following command through your UEM platform, or for local installation - in your terminal with admin permissions:
msiexec /i ZenityInstaller.msi /qn KEY=<YOUR_ENROLLMENT_KEY>
Replace <YOUR_ENROLLMENT_KEY> with the enrollment key obtained in Step 1.3.
Windows Configuration Options
| Setting | Description | Values |
|---|---|---|
| KEY (required) | Enrollment key provided by Zenity to register the endpoint agent | Your enrollment key |
| ENVIRONMENT | Account environment region | - ProductionEU (default) - ProductionUS |
| ALLOW_REBOOT_PROMPT | Upon initial installation only, onboarded devices will be required to restart in order for Zenity's runtime protection to be enabled. After reboot, Zenity's endpoint agent will automatically initiate and connect to your account in Zenity. This configuration prompts the user to reboot for instant activation |
- 0 (default) = lazy activation at next reboot - 1 or yes = prompt user to instantly restart |
| SLACKDOMAIN | Configure your organization Slack workspace to secure | Your organization Slack workspace domain |
| UNINSTALL_PASSWORD | For testing purposes, allow end users to uninstall Zenity's endpoint agent using an admin-set password, bypassing default anti-tampering mechanisms | A password set by your administrator |
For MacOS Devices
Step 2.1: Obtain the Installer
Download the latest version of Zenity's Endpoint Agent Installer (PKG file) from the Devices integration panel in Zenity.
Step 2.2: Deploy Mobile Configuration
Use your preferred UEM platform to deploy the following mobile config to the selected Mac devices:
ZenityDeviceAgentSetupUnsigned.mobileconfig
This mobile config will:
- Add a trusted root certificate to the system keychain (used to trust the certificate generated as part of the device daemon).
- Whitelist Zenity-signed apps to run as background tasks (daemons) without prompting the user/admin for permission.
Step 2.3: Deploy the Endpoint Agent
Use your UEM platform to deploy the Zenity endpoint agent installer (provided as a .pkg file) as an application. In order to do that to run the following script:
#!/bin/bash
defaults write com.zenity.EndpointAgent RegistrationCode -string <YOUR_ENROLLMENT_KEY>
Replace <YOUR_ENROLLMENT_KEY> with your actual registration code (enrollment key) provided by Zenity.
You may paste this directly into your UEM platform as a pre-install script, or upload it as a script to be executed before the package installation.
MacOS Configuration Options
Configure MacOS settings using the defaults command, along with the following properties:
| Command | Description | Values |
|---|---|---|
sudo defaults write com.zenity.EndpointAgent RegistrationCode -string <KEY> (required) |
Enrollment key provided by Zenity to register the device agent | Your enrollment key |
sudo defaults write com.zenity.EndpointAgent HostingEnvironment -string <ENVIRONMENT>> |
Set account environment region | ProductionEU ProductionUS |
sudo defaults write com.zenity.EndpointAgent SlackWorkspaceDomain -string <SLACKDOMAIN> |
Configure Slack workspace domain (requires agent restart) | Your Slack workspace domain |
3. Verify Installation
For Windows Devices
After installing Zenity's endpoint agent and rebooting the device, you can verify the following:
-
Application Installed: Check in Windows Settings app under
Apps > Installed Appsfor "Zenity Endpoint Device Agent". -
Service Running: Open the Windows Services app and verify the "Zenity Endpoint Device Agent" service is running.
-
Zenity Runtime Protection Enabled: Navigate to any AI service supported by Zenity's runtime protection and type
ZenitySanityin the prompt. This will trigger a sanity check rule that blocks the request, confirming that Zenity's endpoint agent is running successfully.
For MacOS Devices
After installing Zenity's endpoint agent and rebooting the device, verify the following:
-
Application Installed: Check for the application at:
/usr/local/bin/zenity/ZenityEndpointAgent.app -
Service Running: Run the following command in Terminal:
bash
   sudo launchctl list | grep com.zenity
The service and watchdog should be listed, and the service should have a PID. -
Zenity Runtime Protection Enabled: Navigate to any AI service supported by Zenity's runtime protection and type
ZenitySanityin the prompt. This will trigger a sanity check rule that blocks the request, confirming that Zenity's endpoint agent is running successfully.
Uninstallation
For Windows Devices
Minimal Uninstall (for upgrades)
When upgrading to a new version, use the following command to perform a minimal uninstall that preserves your existing configurations:
msiexec /x {C703772E-806E-4A36-91A0-451BF47968E9} /qn
Note: Due to anti-tampering defenses, this command cannot be run directly on the device, even with administrator privileges. To enable local users to uninstall the agent, an uninstall password must be set during installation using the UNINSTALL_PASSWORD parameter, and provided here as a parameter.
msiexec /x {C703772E-806E-4A36-91A0-451BF47968E9} /qn UNINSTALL_PASSWORD=<YOUR_ADMIN_PASSWORD>
Full Uninstall (permanent removal)
To permanently uninstall with no intention of upgrading or re-installing:
msiexec /x {C703772E-806E-4A36-91A0-451BF47968E9} /qn FULL_UNINSTALL=1
For MacOS Devices
To uninstall the Mac Agent, use one of the following options (all require admin password and can be executed through your UEM platform):
Minimal Uninstall (for upgrades)
When upgrading to a new version, use the following command to perform a minimal uninstall that preserves your existing configurations:
#!/bin/bash
sudo /Library/Application\ Support/Zenity/AIEdge/ZenityUninstall.app/Contents/Resources/UninstallZenityAgent.sh
Full Uninstall (permanent removal)
To completely remove all Zenity components, run the following command:
#!/bin/bash
sudo /Library/Application\ Support/Zenity/AIEdge/ZenityUninstall.app/Contents/Resources/UninstallZenityAgent.sh FULL_UNINSTALL
Note: The trusted root certificate should be removed through your UEM platform or using a security command line.
Version Updates
Version updates are performed by uninstalling the current version, then re-installing the latest version of the agent.
Please follow the respective Uninstallation and Deploy the Endpoint Agent sections.
Troubleshooting
Log Locations
| Platform | Location |
|---|---|
| Windows (Installation) | Event Viewer app, under Application Log |
| Windows (Post-installation) | C:\ProgramData\Zenity\Endpoint Device Agent\Logs |
| MacOS | /Library/Application Support/Zenity/Endpoint Device Agent/Logs |